Back To Front Page |
|
Buzzer BZ-23/PT Adjustment and
upper housing disassembly Information
Back to Tech Info
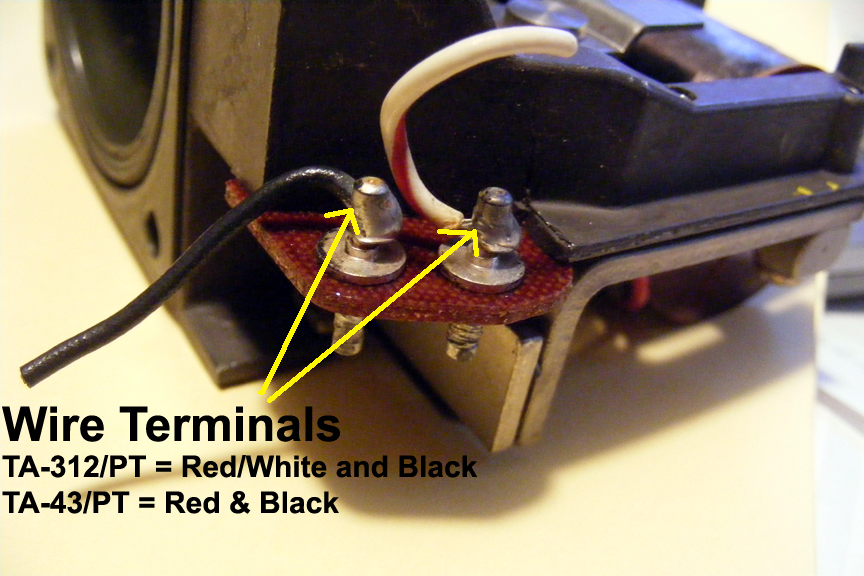
Note: The Buzzer BZ-23/PT is the same for the TA-312/PT, TA-312A/PT, and the TA-43/PT field telephone. The one wire of the two, will vary in color from striped-white and red to solid red; the second wire is always black.
Frequently the volume of the clapper on the buzzer BZ-23/PT will not make the "clacking" sound consistent with the volume control knob setting. There is an adjustment procedure to regulate the volume of clacking. Note: These old field telephones periodically require servicing and the buzzer BZ-23/PT is one of the components requiring this service; provisions (screw adjustments) have been integrated into the buzzer for this purpose. Dropping them or while in transit (shipping) often causes minor problems in moveable components. "It worked before I shipped" is usually true.
I have to post this before I forget about it: 27 Jan 15: Buzzer Doesn't Ring (Work). Prepared to replace a bad seemingly BZ-23/PT buzzer, I first tested a separate new buzzer BZ-23/PT with black and red wires protruding about an inch with the ends stripped 1/2 inch to expose bare wires. Instead of connecting to these wires with the aligotor clips, I connected the two contact points directly to wires from another phone's binding posts. "Didn't work," so I marked it BAD. Then I noticed the bare wire from the black wire was bent out of the way from my aligator clips and touching the frame of the buzzer. I separated that bare wire away from the BZ-23/PT frame and tested it again -- Worked!!
Also today, after determining that the "bad" buzzer BZ-23/PT on the phone I was working wouldn't work. I was about to remove it from the phone. Guess what!! I noticed that there was a small washer clinging to the magnetized frame and also touching one of the contacts -- removed it and it worked. Lesson learned after an hour of pulling my hair out with a new buzzer and about to remove the old buzzer; you have to do a thorough visual inspection to insure there are no objects, screw or washer residue clinging to the magnetized buzzer and grounding it.
The buzzer can not be shut off entirely -- only lowered.
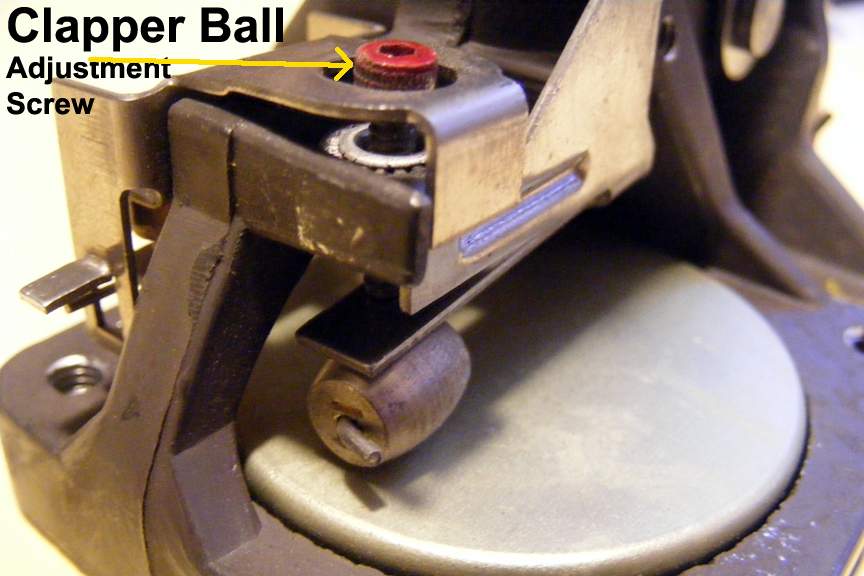
A gap or space of .005mm between the clapper ball and the flat diaphram should remain -- I don't know, look at a .005mm pencil lead in a retractible pen. It's just important to note that a gap needs to be there.
Important: Before you began adjusting or tearing the buzzer apart, do a very close visual inspection of the buzzer for loose washers, small nuts and screws that may have magnetically attached to the strong buzzer's magnetic component. I've frequently found tiny screw debris (not readily visible) stuck behind the clapper's linkage preventing it from properly functioning. After closely looking at the buzzer after I photographed it for this page, I found two small loose washers, and a small nut magnetically attached -- KISS principal here.
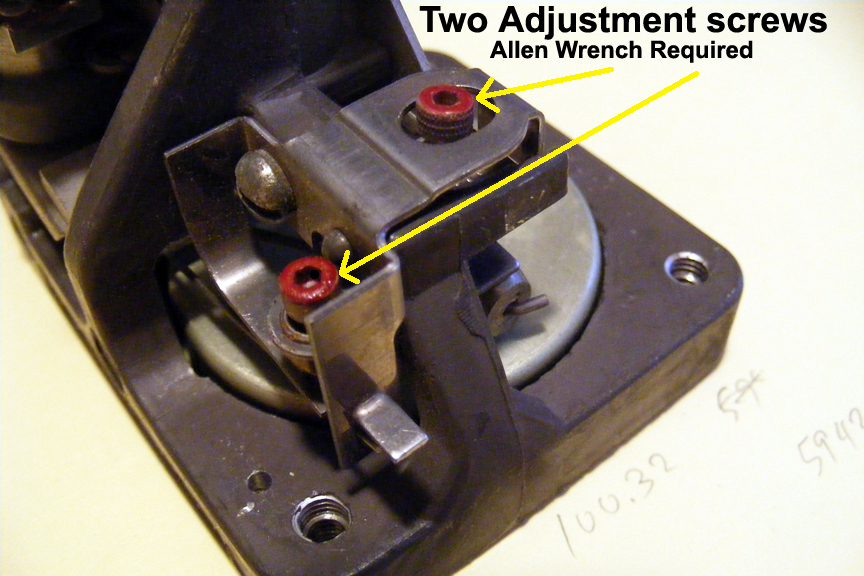
There are two adjustment screws for adjusting the clapper volume: Try these before replacing the buzzer on your TA-312/PT or TA-43/PT.
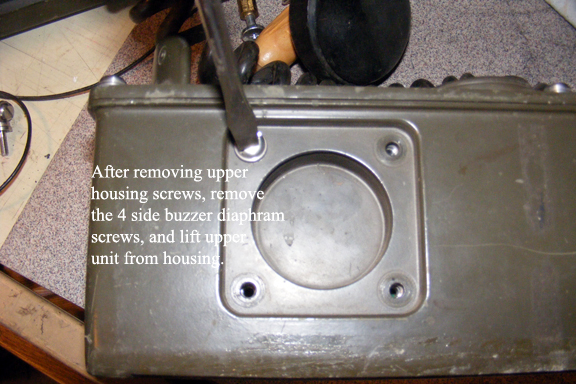
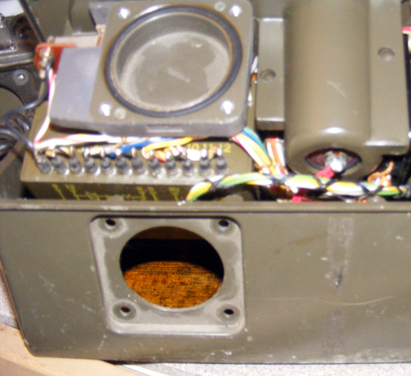
Removing the upper housing compartment: After removing the six screws from the top housing, proceed to remove the four screws (buzzer/clacker) on the side of field phone located as shown below, close to the exterior round buzzer cover unit of the lower housing enclosure. Hey, don't mess with the screws for the Generator. Lift the upper housing unit enough to clear the buzzer unit out of the lower housing compartment. Note: the round rubber gasket might stick a little. You do not have to disconnect any wires to access the buzzer adjustment screws.
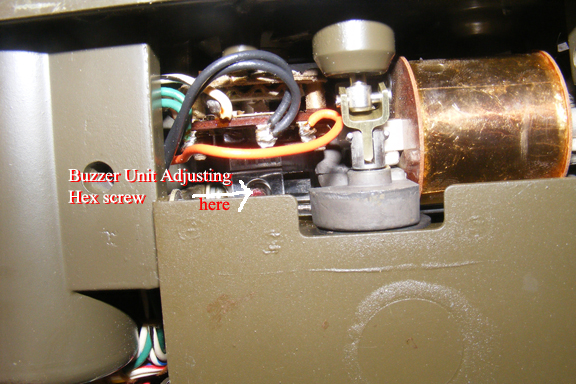
Set the upper housing unit with the buzzer attached on it's side to view and have access to the underside as shown.
First turn the volume control to the extreme high position. Use an allen wrench driver (not a hex) to adjust the adjustment screw for the clapper ball. Note: Obviously you have to be connected to another field telephone to ring the phone as you try adjustments until the buzzer's clacking sound is audible consistent with volume control knob's position you are satisfied with the adjustment. If you don't succeed in hearing any sound, then the electrical coil on the buzzer is defective; replacement is necessary.
As of 20 January, 2021 a new BZ-23/PT is available on EBAY for $75.00 plus shipping; another one I saw on EBAY sells for $38.00 plus shipping. When I have available used, tested, functional BZ-23/PT buzzers i sell for $35-40.00 , with an $10.00 shipping cost. I'll cut the wire about an inch away from the terminals so you will just crimp wires (red and black) back in place, rather than solder -- I'll even include two crimp butt connectors. You need to make sure your generator is not the problem with the buzzer. The generator has two functions: one to ring out to a remote phone without also simultaneously ringing the internal buzzer and secondly to allow the remote ringing signal to pass through the generator to the buzzer. Verify that the buzzer is defective/or good by connecting two wires directly from an external phone to the two wires on buzzer, black and red. You don't need to remove the buzzer for this. You could get a tested buzzer and you may still have the "no buzzer-clapper ringing" if the generatorsĺ buzzer circuit in the generator is defective.
Other symptoms as listed in the Technical Manual for the TA-field phone category:
Symptom: "Buzzer does not sound on incoming signals:
Probable trouble:
- Loose Connections at terminal board
- Corrective Action: Tighten Connections
- Defective Buzzer BZ-23/PT
- Corrective Action:Replace Buzzer BZ-23/PT
- Defective G-42A/PT Generator contacts
- Corrective Action: Replace G-42A/PT Generator
- Defective or broken wires
- Corrective Action: Repair or Replace broken wiring
- Defective capacitor P in CU-350/PT
- Corrective Action: Replace CU-350/PT. My Note: Again, before doing this I would first test the buzzer separately by directly connecting the incoming wires from the test field telephone to the two wire terminals on the buzzer (see photo of wire terminals on top of page) to verify the functionality of the buzzer. Warning: I've done this several times without damaging the buzzer; I can't find anything that would indicate oterwise. But it makes sense to do it before replacing the CU-350/PT or the Hand Generator G-42A/PT.
Back To Front Page |
|