
Back To Front Page |
|
TA-312/PT TA-43/PT Diagnostics
Back to Tech Info
Reception Problems: Offered here are some common receiver problems and fixes with the TA-312/PT and/or TA-43/PT.
After you have gone through the common-sense steps of visually inspecting for loose wires and screws, cut or frayed wires, then the following procedure are offered here: Hopefully, at least, this page will generate more useful ideas. If you have an easier or better method, please e-mail me so we can share it with others:
Won't Recieve and sometimes intermittent reception:
Assuming you are certain you have a good TA-235/PT element:
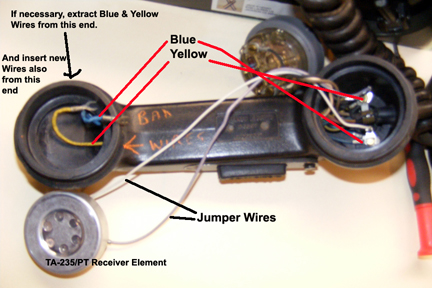
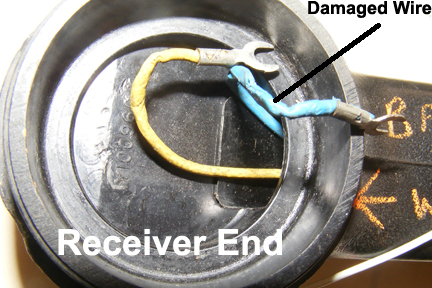
Before I begin, keep in mind that the Blue and Yellow Wires from the Receiver End by-pass the Push-to-Talk switch; so this switch has nothing to do with receiving. The first thing I did was open the unit housing and conduct an electrical continuity test from the blue and yellow wires on the black terminal board to the blue and yellow wires at the Handset Receiver. A defective frayed wire just barely connected will give a weak reading and maybe interpreted as a good connection. If you still have no reception and questionable reading from the Ohm meter.
The second thing I did was to further isolate the problem to the Handset by jumping with a new phone the blue and yellow wires on the black terminal board. Not everyone has the luxury of an extra, separate handset H-60 to do this. With this procedure, it can be determine also if the Blue and Yellow wires inside the coil are fractured/defective. So if you determine the short Blue and Yellow Wires from the Receiver Element routed through the Xmter cavity are good, it can also be that the wires in the coil may be defective. Remember, these coils are frequently abused by over stretching them, thus breaking the wires not visible inside the black rubber insulation of the coil.
If you isolate the problem to the one or both short handset blue and/or yellow wires, pull them out through the Receiver end. You really don't need the rubber insert that is attached to the wires. Just stick and slide a good wire through the same hole you pulled out the defective wire and connect them to the same connection as the previous wire. Good luck. I may not have been methodical here, so as I review this later, I'll probably change it over and over again. Next, I'll post procedures or my experience for Transmitting problems. By the way you can hold in your hand the Receiver and Transmitter elements that are protruding out of their intended cavaities and test them by a SideTone procedure or with another phone connected to this phone normally through the binding posts -- so many ways.
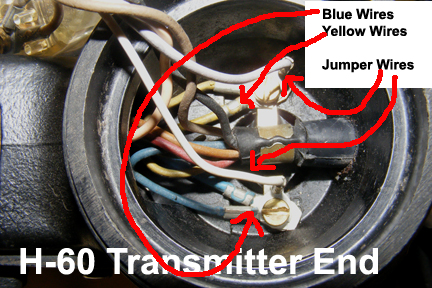
 Notice here where I jumpered the Blue and Yellow wires at the Xmtr side where the cord/coil blue and yellow circuit continues to the Black Terminal Board.
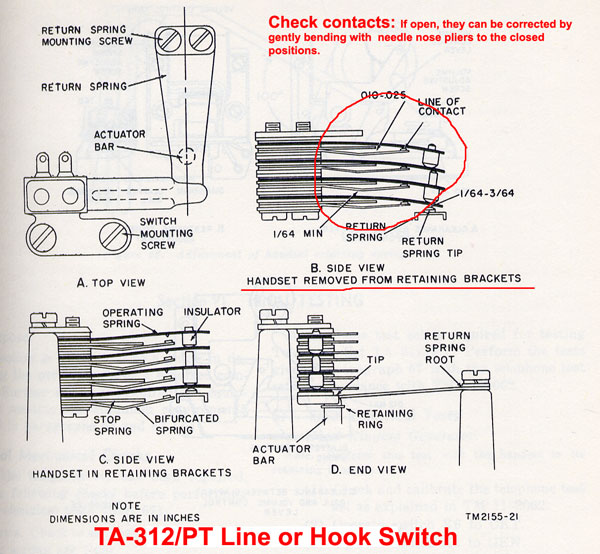
Line Hook Switch
Open contacts, when they should be closed are also a problem. This is a common problem. All contacts should be closed when the handset is off the retaining brackets, as indicated and depicted here. This happens often when someone, or I, inadvertantly place the upper disassembled unit against some thing on the hook switch. Just take the needle pliers and gently bend back into a closed position. Also don't forget to lightly clean the contacts. I use a fingernail sandpaper file.
Back To Front Page |
Or
Back to Tech Info
|